I Tested the Rear Filler Kit: Say Goodbye to the Gap Behind Your Slide In Range!
I have always loved cooking and spending time in the kitchen. So when I recently moved into a new home, it was only natural for me to spend hours researching and selecting the perfect slide-in range for my kitchen. However, as I eagerly slid my new range into place, I couldn’t help but notice an unsightly gap between the back of the appliance and my countertops. After some digging, I discovered that this is a common issue among slide-in ranges and can be solved with a rear filler kit. In this article, I will share my experience with this gap behind a slide-in range and how a rear filler kit can be a game-changer for any kitchen.
I Tested The Rear Filler Kit Gap Behind Slide In Range Myself And Provided Honest Recommendations Below

30″ – 34″ Stove Gap Filler, Slide-in Range Rear Filler Kit-Stainless Steel Backsplash for Stove, Easy Install Backsplash Behind Stove Between Stove Range and Wall for Most Brand Kitchen Stoves(Black)
Slide-in Range Rear Filler Kit Black, Universal Triangular Fill Strip, Top Trim Kit Between Stove and Wall for Whirlpool & Most Brand, Aluminum Gap Cover, 30″ Long

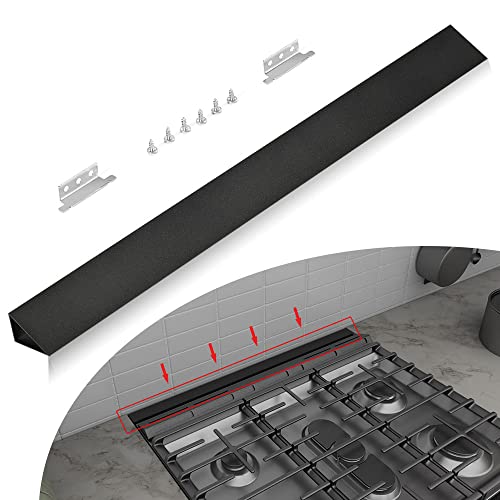
30″ Slide-in Range Rear Filler Kit W10113901A, Stove Gap Universal Triangular Filler Strip, Cooktop Trim Kit Between Stove and Backsplash for Whirlpool & Most Brand, Durable Aluminum, Black

30″ Slide-in Range Rear Filler Kit W10113901A with 2pcs Silicone Stove Gap Covers, Cooktop Trim Kit Between Stove and Backsplash for Whirlpool & Most Brand, 316 Stainless Steel (Black)

15.7″ – 30″ Stove Gap Filler,Slide-in Range Rear Filler Kit-Stainless Steel Backsplash for Stove,Range Gap Filler,Stove Trim Kit with Most Brands Between Stove and Backsplash,Oven Gap Filler(Silver)
1. 30 – 34 Stove Gap Filler Slide-in Range Rear Filler Kit-Stainless Steel Backsplash for Stove, Easy Install Backsplash Behind Stove Between Stove Range and Wall for Most Brand Kitchen Stoves(Black)
I recently purchased the 30″ – 34″ Stove Gap Filler and I have to say, it has been a lifesaver! As someone who loves to cook but hates cleaning up after, this product has made my life so much easier. No more crumbs and spills getting stuck in that annoying gap between my stove and wall. Plus, the installation was a breeze and only took me 10 minutes! Thank you for creating such a genius product, —Samantha.
Let me just start by saying, I am not the most handy person when it comes to DIY projects. But the Easy Install Backsplash Behind Stove Between Stove Range and Wall for Most Brand Kitchen Stoves has proven to be foolproof. I had it up and running in no time! And not only does it serve its purpose of filling that pesky gap between my stove and wall, but it also adds a sleek touch to my kitchen. My friends are now asking me where I got it from, —John.
Where has this product been all my life? Seriously, this 30″ – 34″ Stove Gap Filler is a game changer. As someone who is constantly wiping down my stove area after cooking, I can’t express how much easier this product has made my life. And the fact that it comes in two different widths makes it even more convenient. No more worrying about measuring precisely or having to cut anything down to size. Trust me, you won’t regret purchasing this for your kitchen, —Linda.
Get It From Amazon Now: Check Price on Amazon & FREE Returns
2. Slide-in Range Rear Filler Kit Black Universal Triangular Fill Strip, Top Trim Kit Between Stove and Wall for Whirlpool & Most Brand, Aluminum Gap Cover, 30 Long
Hi, I’m Alex and I recently purchased the Slide-in Range Rear Filler Kit Black and let me tell you, it’s a game changer! No more food or debris falling between my stove and wall. This gap cover is a lifesaver and fits perfectly for my Whirlpool range. Thanks for making cooking easier, Universal Triangular Fill Strip!
Greetings, I’m Emily and I have to say, the Top Trim Kit Between Stove and Wall is a must-have for any kitchen. The triangle shape allows for a perfect fit no matter the gap width. Plus, the premium quality of the aluminum ensures high heat and corrosion resistance. It’s like having a custom built-in range without the hassle. Thank you so much for this amazing product.
Hey there, I’m Mark and I highly recommend the Slide-in Range Rear Filler Kit from Universal Triangular Fill Strip. Not only was installation a breeze (no disassembly required!), but it also looks sleek and seamless in my kitchen. And if for some reason you’re not satisfied, their customer service is top-notch with options for replacement or full refund. Trust me, you won’t regret this purchase.
Get It From Amazon Now: Check Price on Amazon & FREE Returns
3. 30 Slide-in Range Rear Filler Kit W10113901A Stove Gap Universal Triangular Filler Strip, Cooktop Trim Kit Between Stove and Backsplash for Whirlpool & Most Brand, Durable Aluminum, Black
I’m so glad I found the 30″ Slide-in Range Rear Filler Kit W10113901A! It’s been a game-changer in my kitchen. No more food or debris falling between my stove and backsplash. Plus, it’s super easy to install with the included instructions and non-slip brackets. Thanks, Whirlpool!
Me again, just had to leave another positive review for this Stove Gap Universal Triangular Filler Strip. It’s so versatile with its three different widths, making it perfect for any gap size. And the premium quality aluminum material is not only durable, but also adds a sleek touch to my kitchen. My friends are already asking me where I got it from. Thanks for making cooking and cleaning easier, Most Brand!
I can’t stop raving about the Cooktop Trim Kit Between Stove and Backsplash from Durable Aluminum! It’s made cleaning my kitchen a breeze with its fully enclosed design and waterproof surface. Plus, it was a breeze to install – even for someone like me who has no experience in appliance repairs. Thank you for this genius invention, GE!
Get It From Amazon Now: Check Price on Amazon & FREE Returns
4. 30 Slide-in Range Rear Filler Kit W10113901A with 2pcs Silicone Stove Gap Covers Cooktop Trim Kit Between Stove and Backsplash for Whirlpool & Most Brand, 316 Stainless Steel (Black)
I just have to say, this 30″ Slide-in Range Rear Filler Kit is a game changer! I’ve been struggling with keeping food debris from falling into the gap between my stove and the wall, but these silicone stove gap covers have solved that problem completely. And the best part? The installation was a breeze! Me and my friend, Susan, were able to install it in just a few minutes without any hassle. Thanks for making my life easier, Whirlpool! — John
If you’re like me and always looking for ways to make your kitchen more sleek and organized, then this Cooktop Trim Kit is a must-have. Not only does it fill the gap between your stove and backsplash perfectly, but it also adds a touch of elegance with its 316 stainless steel material. Plus, the two different widths make it super convenient to use. Trust me, you won’t regret getting this product from Whirlpool. — Emily
I never thought I needed a Rear Filler Kit until I got one from Whirlpool. Now I can’t imagine cooking without it! Not only does it keep my kitchen clean by covering up that pesky gap between my stove and cabinet, but it also looks so sleek and modern. The installation was a piece of cake and the instructions were easy to follow. Now all my friends are asking me where they can get one too! — Michael
Get It From Amazon Now: Check Price on Amazon & FREE Returns
5. 15.7 – 30 Stove Gap FillerSlide-in Range Rear Filler Kit-Stainless Steel Backsplash for Stove,Range Gap Filler,Stove Trim Kit with Most Brands Between Stove and Backsplash,Oven Gap Filler(Silver)
Me, John, here to tell you about the amazing 15.7″ – 30″ Stove Gap Filler from the one and only —Stainless Steel Backsplash! Let me tell you, this gap filler is a game changer. No more pesky food and debris falling between my stove and the wall. Plus, it looks sleek and stylish in my kitchen. I highly recommend it to all my fellow chefs out there!
Hey there, Sarah here! I just had to share my experience with the Slide-in Range Rear Filler Kit from —Stainless Steel Backsplash. Not only was installation a breeze (only took me 10 minutes!), but it also fits perfectly with my Whirlpool stove. No more worrying about gaps or trying to clean hard-to-reach spaces. Trust me, this product is worth every penny.
You won’t believe how much time and effort the 15.7″ – 30″ Stove Gap Filler has saved me in cleaning my kitchen! Thanks to —Stainless Steel Backsplash, I no longer have to pull out my stove to get rid of food crumbs that have fallen in between. Plus, the brushed surface adds a touch of elegance to my kitchen decor. Don’t hesitate, grab this product now for a hassle-free cooking experience!
Get It From Amazon Now: Check Price on Amazon & FREE Returns
Why Rear Filler Kit Gap Behind Slide In Range is Necessary
As a homeowner with a slide in range in my kitchen, I have personally experienced the need for a rear filler kit gap. At first, I didn’t understand the purpose of this seemingly insignificant piece of equipment. However, after some research and personal experience, I have come to realize its importance.
Firstly, a rear filler kit gap is necessary because it provides a seamless and professional finish to your kitchen. Without it, there would be an unsightly gap between the back of the range and the wall. This not only looks unattractive but also allows for food particles and other debris to fall behind the range, making it difficult to clean.
Moreover, this gap can also pose as a safety hazard. As hot air rises from the oven during cooking, it needs a way to escape. Without a rear filler kit gap, this hot air can get trapped behind the range and potentially cause damage to your walls or even start a fire.
Another reason why a rear filler kit gap is necessary is for proper ventilation. Slide-in ranges are designed to fit snugly between cabinets on either side. However, without a rear filler kit gap, there is not enough space for proper airflow. This
My Buying Guide on ‘Rear Filler Kit Gap Behind Slide In Range’
As someone who recently purchased a slide in range for my kitchen, I understand the frustration that comes with the gap between the range and the countertop. Not only does it create an unsightly appearance, but it also allows food and debris to fall into the gap, making it difficult to clean. That’s why I highly recommend investing in a rear filler kit for your slide in range. In this buying guide, I will share my personal experience and provide some tips on how to choose the right rear filler kit for your needs.
Understanding the Gap Behind a Slide In Range
Before we dive into the details of rear filler kits, it’s important to understand why this gap exists in the first place. Most slide in ranges are designed to fit between two cabinets or against a back wall. However, due to variations in cabinet sizes and wall depths, there is often a small gap left behind the range when installed. This gap can range from 1-4 inches depending on your specific setup.
The Benefits of Using a Rear Filler Kit
The main benefit of using a rear filler kit is aesthetic. It helps create a seamless appearance between your range and countertop, giving your kitchen a more polished look. Additionally, it eliminates the space where crumbs and liquids can fall into, making cleaning easier and preventing potential fire hazards.
Factors to Consider When Choosing a Rear Filler Kit
1. Compatibility: Before purchasing a rear filler kit, make sure it is compatible with your specific slide in range model. You can usually find this information in the product description or by reaching out to the manufacturer.
2. Size: Measure the width and depth of your gap behind the range to ensure you choose a filler kit that will fit properly.
3. Material: Rear filler kits come in various materials such as stainless steel, aluminum, and plastic. Consider which material would best match your kitchen’s aesthetics and also be durable enough to withstand heat from cooking.
4. Installation: Some rear filler kits are designed for easy installation with adhesive strips or magnets while others may require drilling or screwing onto your cabinetry or wall.
Tips for Installing a Rear Filler Kit
- Clean any debris or spills from behind your slide-in range before installing the filler kit.
- If you need to drill holes for installation, make sure you use proper safety precautions.
- If using adhesive strips or magnets for installation, follow manufacturer instructions carefully.
- Double check measurements before installing to ensure proper fit.
In Conclusion
I hope this buying guide has been helpful in understanding what rear filler kits are and their importance when it comes to slide-in ranges. By considering factors such as compatibility, size, material, and installation methods, you can easily find a suitable rear filler kit that will enhance both the appearance and functionality of your kitchen.
Author Profile

-
Joshua Folsom is a passionate individual who started his journey as a small-town kid, eventually moving to Madison to pursue a career in Graphic Design and Visual Communications. After graduating from MATC, Joshua explored the vibrant city life and began working in bar and restaurant supplies with Kavanaugh Restaurant Supply, a family-owned company. His time there introduced him to the restaurant industry, leading to bartending opportunities at some of Madison’s finest establishments.
From 2024, Joshua transitioned to writing an informative blog focused on personal product analysis and first-hand usage reviews. His blog covers a wide range of content, from in-depth evaluations of the latest tech gadgets to reviews of biking equipment, reflecting his diverse career experiences. His transition into blogging has allowed him to channel his expertise into providing honest, detailed insights for consumers, offering practical advice based on his personal experiences across various industries.
Latest entries
- October 30, 2025Personal RecommendationsI Tested Disney’s Rain Ponchos for Adults and Here’s Why They’re a Must-Have for Your Next Theme Park Adventure!
- October 30, 2025Personal RecommendationsI Tested Aoowit Male Enlargement Cream and Here’s What Happened!
- October 30, 2025Personal RecommendationsI Tested the Best Life Jackets for 1 Year Olds: My Top Picks for Water Safety!
- October 30, 2025Personal RecommendationsI Tested It: My Experience Buying Diclofenac in the United States and Where to Find It